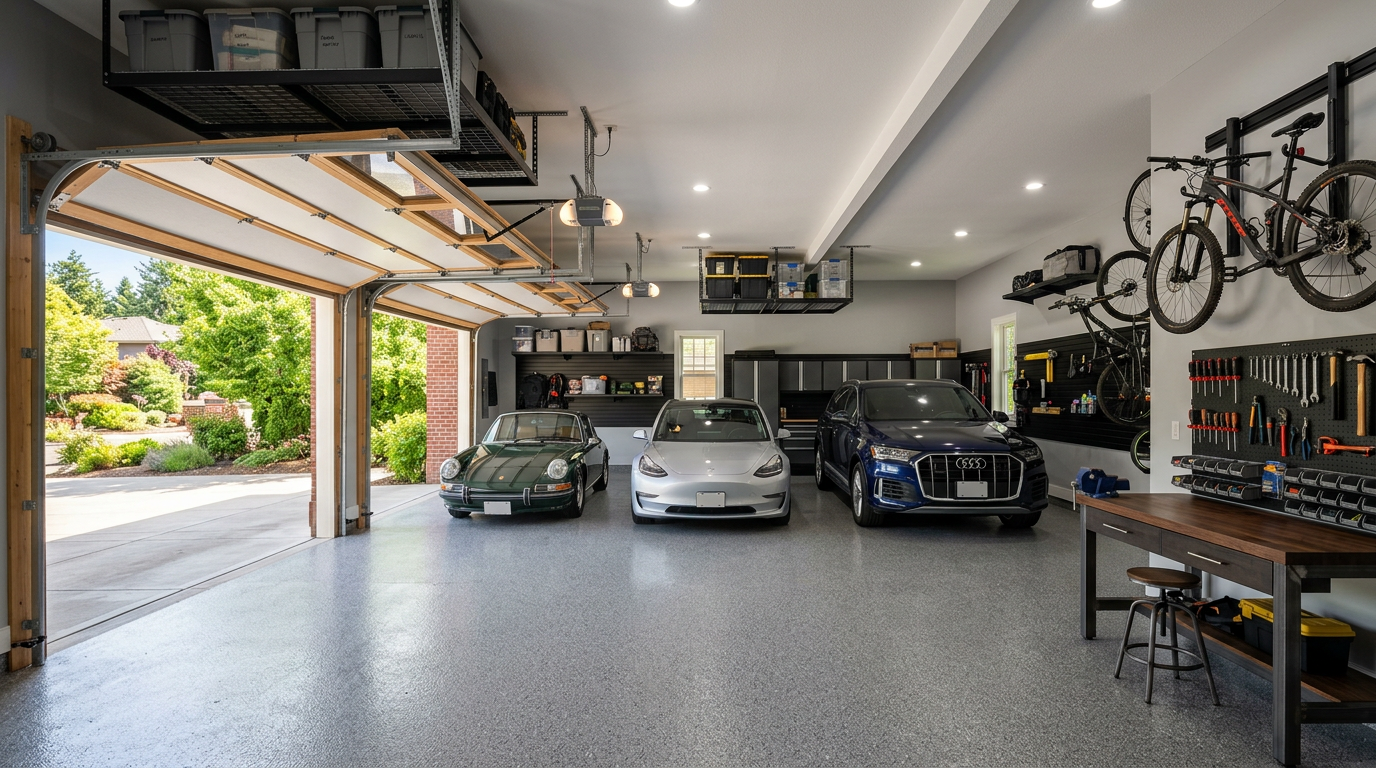
For most homeowners, the garage is a missed opportunity. It often becomes a disorganized holding zone for cardboard boxes, half-empty paint cans, and lawn tools, leaving the family car parked in the driveway. With a thoughtful layout, durable materials, and the right mechanical upgrades, this underutilized square footage can become a clean, climate-controlled, and highly functional extension of your living space.
Here is a practical guide to reclaiming your garage, from the concrete floor to the ceiling joists.
High-Performance Flooring: Beyond Bare Concrete
Unfinished concrete is porous, dusty, and prone to permanent staining from oil and automotive fluids. A high-quality floor coating is the single most impactful upgrade you can make, instantly transforming the space into a bright, easy-to-clean room.
While traditional epoxy paints are common DIY projects, professional-grade coatings offer vastly superior durability. In hot climates, the choice between epoxy and polyaspartic coatings is particularly important.
| Feature | Epoxy Coatings | Polyaspartic Coatings |
|---|---|---|
| Cure Time | 3 to 5 days before vehicle traffic | 24 hours to full cure |
| UV Resistance | Can yellow or fade over time | High UV resistance; will not yellow |
| Flexibility | Rigid; can chip under heavy impacts | Extremely flexible; resists impacts |
| Application Temp | Highly sensitive to heat and humidity | Can be applied in extreme temperatures |
In hot climates, polyaspartic coatings are the clear winner. Traditional epoxy can struggle to cure properly in high humidity, and the summer heat can cause "hot tire pickup," where warm tires literally peel the coating off the concrete. Polyaspartic formulas bond chemically with the concrete, cure incredibly quickly—allowing you to put your heavy storage back in place the next day—and tolerate high-temperature environments without breaking down.
Unlocking the Vertical Space: Smarter Storage
To make a garage truly usable, you have to get everything off the floor. This starts by looking up and utilizing three distinct zones: the ceiling, the walls, and the back perimeter.
The Top Two Feet: Overhead Ceiling Racks
The space directly above your garage door tracks and ceiling joists is prime real estate that is almost always wasted. Installing heavy-duty, ceiling-mounted steel racks (such as those from Fleximounts or Monkey Bars) allows you to store seasonal items like holiday decorations, camping gear, and luggage completely out of sight.
When planning ceiling racks, ensure they are anchored directly into the ceiling joists with heavy-duty lag bolts. Keep low-clearance items above the garage door travel path, and place deeper racks over areas where the hood of your vehicle parks to maintain comfortable head clearance.
Wall-Mounted Storage: Slatwall vs. Pegboard
For items you need to access regularly, wall-storage systems keep tools, ladders, and sports gear organized and visible.
- Slatwall Systems: Made from dense PVC or cellular MDF, slatwall offers a clean, retail-showroom look. The horizontal grooves run the entire length of the panel, allowing you to slide and lock in heavy-duty hooks, baskets, and shelving anywhere you need them. Slatwall can support significant weight, making it ideal for hanging heavy weed weed-eaters, leaf blowers, and bicycles.
- Traditional Pegboard: A budget-friendly classic. While useful for hand tools and light items, traditional pressed-wood pegboard can sag over time if exposed to garage humidity. If you prefer pegboard, opt for heavy-duty metal panels, which won't warp and can handle heavier loads.
Back-Wall Shelving
Along the far back wall of the garage, install deep, heavy-duty freestanding or wall-mounted shelving units. Keeping these shelves uniform in size allows you to use matching plastic storage bins with clear labels. This creates a cohesive, tidy look and prevents the visual clutter that makes a garage feel cramped.
Creating a Dedicated Workbench Zone
Whether you are repairing a household appliance, tuning up a bicycle, or working on a hobby, a dedicated workbench is the heart of a functional workspace.
+-------------------------------------------------------------+
|                     LED Task Lighting                       |
+-------------------------------------------------------------+
|                                                             |
|   +-----------------------------------------------------+   |
|   |                  Slatwall Backsplash                |   |
|   +-----------------------------------------------------+   |
|                                                             |
|   +-----------------------------------------------------+   |
|   | [ ] [ ]   Dedicated 20A GFCI Outlets   [ ] [ ]    |   |
|   +-----------------------------------------------------+   |
|                                                             |
|   =======================================================   |
|   ||                 Butcher Block Top                 ||   |
|   =======================================================   |
|                                                             |
+-------------------------------------------------------------+
Position your workbench along a wall where you have ample clearance to stand and move. A heavy-duty, 1.75-inch thick maple butcher block top is ideal for general woodworking and household projects because it absorbs impacts and can be sanded down and refinished over time. For heavy automotive work orProjects involving oils and solvents, a stainless steel top is preferable as it resists chemical damage and wipes clean easily.
Mount a slatwall panel directly behind the bench to keep your most frequently used hand tools within arm's reach. For lighting, skip the standard overhead ceiling lights and mount dedicated, high-output LED utility lights directly above the work surface to eliminate shadows. Finally, ensure you have multiple electrical outlets positioned just above the bench surface so you never have to stretch cords to power your tools or chargers.
The Mudroom Drop Zone
For most families, the door leading from the garage into the house is the primary entrance. Rather than letting shoes, backpacks, and wet coats pile up just inside the kitchen, create a transition zone on the garage side of the door.
This drop zone doesn't need to be elaborate to be highly effective. A simple built-in or freestanding unit featuring a sturdy bench gives family members a place to sit and remove dirty shoes. Underneath the bench, open cubbies or slide-out baskets can catch athletic shoes and boots. Above the bench, install heavy-duty double coat hooks for jackets, dog leashes, and school bags.
To keep the transition clean, place a durable, low-profile outdoor rug right in front of the bench to catch dirt and debris before it can be tracked into the main house.
Climate Control and Insulation
If you intend to use your garage as a workshop, home gym, or detailed hobby space, managing the temperature is essential. In southern regions where summers are intense, an uninsulated garage can easily exceed 100 degrees, rendering the space unusable for half the year and potentially damaging stored items.
The most effective way to turn a garage into a comfortable, year-round room is by installing a ductless mini-split heat pump.
- Sizing the System: For a standard two-car garage (roughly 400 to 500 square feet), an 18,000 BTU mini-split is typically the sweet spot. It provides ample cooling capacity to combat high heat loads without cycling on and off too quickly.
- Why Mini-Splits Work: They don't require ductwork, operate incredibly quietly, and are highly energy-efficient. They also help dehumidify the air, preserving your tools and storage from moisture damage.
However, a mini-split is only as good as the envelope keeping the air inside. Before installing climate control, you must address insulation:
- The Garage Door: An uninsulated metal garage door acts as a giant radiator in the summer sun. Upgrade to a modern, polyurethane-insulated garage door with a high R-value, or install a high-quality foam barrier insulation kit on your existing door.
- Weather-Stripping: Replace worn-out rubber seals along the bottom of the garage door and install vinyl weather-stripping along the sides and top of the frame to prevent hot air infiltration. Ensure the pedestrian entry door into your home is also properly sealed.
Power and Electrical Infrastructure
A modern, highly functional garage places heavy demands on your home’s electrical system. Modern building codes (NEC) now require GFCI (Ground Fault Circuit Interrupter) protection on all garage receptacles to prevent electrical shock in damp environments.
When upgrading your garage, do not rely on a single, shared circuit. Plan for a robust electrical layout:
- Dedicated 20A Workbench Circuit: Power tools, air compressors, and shop vacs draw significant current. A dedicated 20-amp circuit ensures you won't trip a breaker when running two tools simultaneously.
- Dedicated Freezer/Fridge Circuit: If you keep an extra refrigerator or chest freezer in the garage, give it its own dedicated circuit. This prevents a tripped breaker from a tool elsewhere in the garage from spoiling your food supply.
- 240V Circuitry: If you plan on running a heavy-duty table saw, a welder, or installing a Level 2 electric vehicle (EV) charger, you will need to run a dedicated 240-volt circuit from your main panel. Planning this electrical infrastructure during your initial garage remodel saves significant time and drywall repair costs down the road.
Finishes, Openers, and Final Touches
To complete the transformation, pay attention to the details that make the space feel like a natural extension of your home's interior.
- Wall Finishes: Bare drywall taping is common in garages, but finishing, texturing, and painting the walls makes a massive difference. Use a durable, semi-gloss exterior latex paint. Light colors—such as soft whites or light grays—will reflect the light from your LED fixtures, making the entire room feel much larger, brighter, and cleaner.
- Lighting Upgrades: Replace old fluorescent tubes with modern linkable LED shop lights. Aim for bright, uniform light across the entire ceiling. Adding a motion sensor switch at the entry doors ensures the lights turn on automatically when you walk in with your hands full of groceries.
- Smart Garage Door Openers: Swap out loud, chain-driven garage door openers for a modern, wall-mounted side-drive (jackshaft) opener. These units mount to the side of the garage door torsion bar, freeing up valuable ceiling space directly above the door and operating with virtually zero vibration and noise. Many modern units feature built-in smart controls, allowing you to monitor and operate the door from your phone.
By combining durable flooring, smart vertical storage, dedicated task zones, and climate control, your garage can evolve from a cluttered utility space into one of the most productive, enjoyable, and valuable rooms in your home.
If you are ready to stop fighting the clutter and start maximizing your home's square footage, the team at Modern Builders of America is here to help design and build a custom garage space tailored to your lifestyle. Contact us today at /contact to schedule a free, in-home estimate and discuss what is possible for your home.