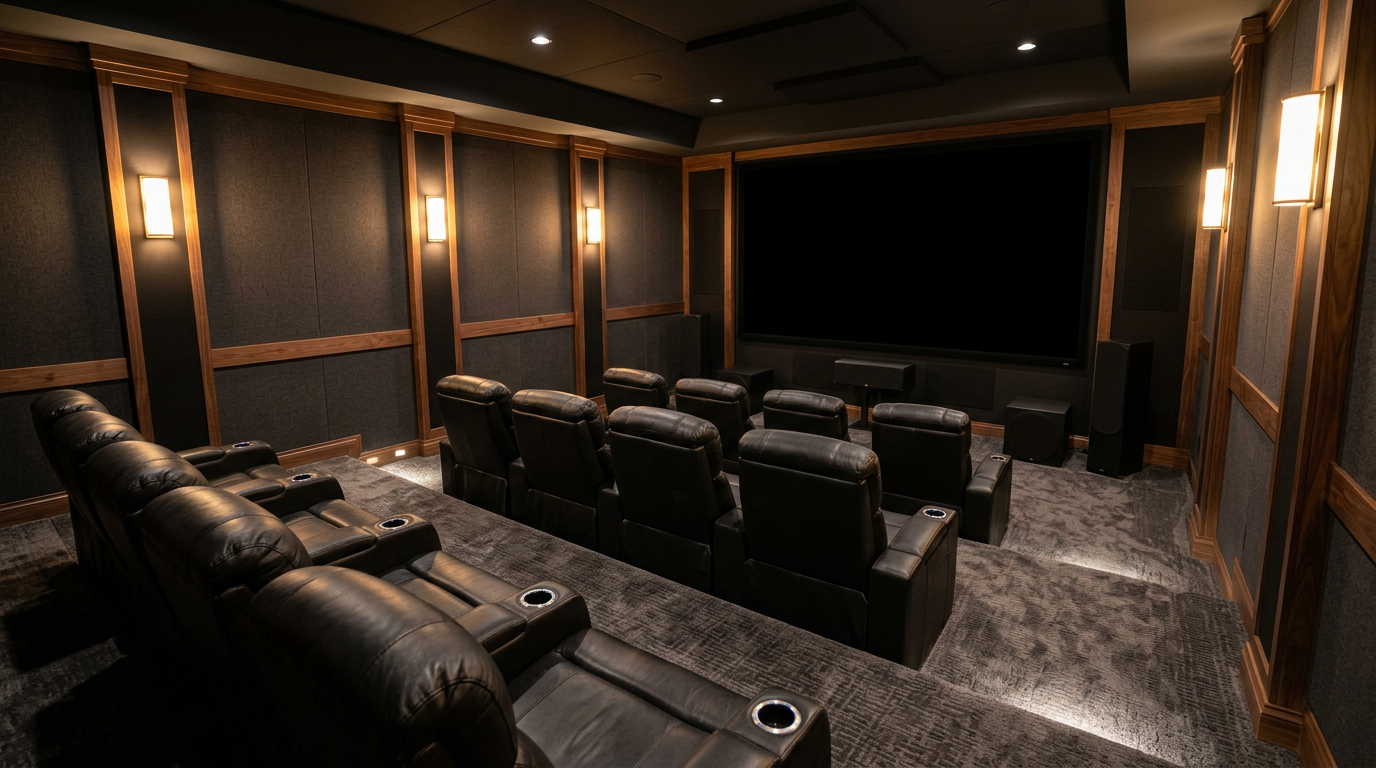
Building a dedicated home theater is one of the most rewarding home improvement projects you can undertake. Unlike a multipurpose media room or a family room with a TV over the fireplace, a dedicated theater is a space designed for a single, uncompromising purpose: total immersion in cinema.
Creating that perfect escape requires balancing several distinct disciplines, from structural carpentry and acoustics to interior design and high-end electronics. When these elements are planned together from the start, the result is a room that outperforms the local multiplex.
Designing the Shell: Room Selection and Layout
The foundation of any great dedicated home theater is the room itself. Before you run a single wire or buy a single speaker, you need to evaluate the physical space.
Room Shape and Selection
When choosing a room for a theater conversion, an interior basement room is almost always the premier choice. Basement rooms naturally stay dark, are surrounded by concrete or earth that helps isolate sound, and are less likely to disrupt the rest of the household.
If possible, avoid perfectly square rooms. Square rooms create massive acoustic challenges, particularly with "standing waves"—bass frequencies that bounce between parallel walls of equal length and cancel each other out or create muddy, boomy hot spots. A rectangular room is much easier to tune acoustically.
Windows and Doors
A true home theater should have zero windows. If your chosen room does have windows, we recommend sealing them permanently or using custom-built insulated window plugs covered by heavy blackout velvet drapes.
Door placement is equally critical. Try to avoid placing the entrance door at the front of the room near the screen, as light leaks will ruin the image contrast. Placing the door at the rear corner of the room is ideal. Use a solid-core wood door rather than a hollow-core door, and equip it with heavy-duty weather stripping and a drop seal at the bottom to lock sound inside the room.
Screen Sizing and Projection Technology
Designing your video setup starts with a simple question: How big can you comfortably go?
The Viewing Distance Formula
A screen that is too small feels underwhelming, while one that is too large causes eye strain as your tracking muscles work to follow the action. For a modern 4K Ultra HD display, the ideal viewing distance is roughly 1.5 times the diagonal width of the screen.
| Screen Diagonal | Ideal Viewing Distance (Range) |
|---|---|
| 100 Inches | 10 to 12.5 Feet |
| 120 Inches | 12 to 15 Feet |
| 150 Inches | 15 to 18.5 Feet |
If your primary seating row is 12 feet away from the front wall, a 100-to-120-inch screen is your sweet spot.
Ultra-Short Throw (UST) Projector vs. Traditional TV
In sizes up to 85 inches, a high-end OLED or LED television offers unmatched brightness and black levels. However, if you want a true cinematic experience of 100 inches or larger, a laser projector paired with a fixed, ambient-light-rejecting (ALR) screen is the superior choice.
Modern laser projectors turn on instantly, require no lamp replacements, and provide incredible color accuracy. When paired with a tensioned, fixed-frame screen, they deliver a massive, reflection-free image that mimics the texture of a real movie theater.
Sound: Layouts, Channels, and Calibration
Picture quality gets you to the theater; great sound keeps you there. To achieve multidimensional sound, we look to three primary audio configurations.
Audio Configurations Explained
- 5.1 Surround Sound: This is the traditional standard. It includes a center speaker (primarily for dialogue), left and right front speakers (for music and soundstage), two surround speakers placed slightly behind or to the sides of the listener, and one subwoofer (.1) for low-frequency bass.
- 7.1 Surround Sound: This setup adds two rear surround speakers to the 5.1 layout. This fills in the audio gap behind your head, creating a seamless 360-degree sound field. Use this layout if your room is deeper than 15 feet.
- Dolby Atmos (e.g., 7.1.4): Atmos introduces height channels to the mix. Instead of sound moving only left, right, front, and back, Atmos allows sound to move overhead. A "7.1.4" system has seven traditional ear-level speakers, one subwoofer, and four dedicated in-ceiling height speakers. This is how you hear a helicopter fly directly over your head or rain falling all around you.
       [ Screen ]
   [L]   [C]   [R]
      \       /
       \     /
 [SL]   [X]   [SR]  <-- Seating Position
       /     \
   [RL]       [RR]
Subwoofer Placement and Room Correction
Subwoofers reproduce low-frequency bass, which is omnidirectional but highly susceptible to room geometry. Placing a subwoofer in a corner often creates boomy, bloated bass. The goal is tight, punchy bass that you can feel in your chest without rattling the teeth in your mouth. Often, using two smaller subwoofers placed on opposite walls yields a much smoother bass response across all seating positions than one large subwoofer.
Once your speakers are in place, utilize your AV receiver’s built-in room correction software (such as Audyssey, Dirac Live, or Anthem ARC). These systems use a calibrated microphone to measure your room's unique acoustic signature and apply digital filters to smooth out any frequency peaks or dips.
Acoustic Treatment: Controlling the Reflection
Many homeowners spend thousands on high-end audio equipment only to place it in a room with bare drywall. This leads to a harsh, echo-heavy space where speech is difficult to understand. To fix this, you must treat the room using three distinct tools: bass traps, absorption panels, and diffusion panels.
Bass Traps
Low-frequency bass waves tend to pool in the corners of a room. This causes "one-note bass," where different bass frequencies all sound like a muddy drone. Thick acoustic bass traps placed in the vertical corners of your room—especially behind the screen—will absorb these long waves and make your bass sound incredibly tight and defined.
Absorption Panels
When sound leaves your front speakers, some of it travels directly to your ears, but some of it bounces off the side walls first. This is called "first reflection" and it muddies the stereo image. By mounting 2-inch-thick fabric-wrapped fiberglass absorption panels at these first-reflection points on the side walls, you absorb that early bounce, greatly improving dialogue clarity.
Diffusion Panels
If you absorb all sound, your room will feel dead, claustrophobic, and unnatural. On the back wall behind your seating, use diffusion panels. High-quality wooden diffusers don't stop sound; they scatter it in random directions. This tricks your brain into thinking the rear wall is much farther away than it actually is, making your theater room feel vast and airy.
Seating and Ergonomics
How you organize your seating dictates the comfort and flow of your theater. If you have the space, a two-row theater seating layout offers the best hosting experience.
Building a Riser
To prevent the heads of the people in the front row from blocking the view of the people in the back row, you must build a seating riser. For a typical theater chair, a riser height of 6 to 8 inches is standard. This riser should be constructed like a mini-floor system with 2x6 or 2x8 joists, filled tightly with fiberglass insulation to prevent it from acting like a giant drum when the bass kicks in, and topped with two layers of plywood.
Accessibility and Flow
Never crowd your seating. Ensure you leave an ADA-friendly wide aisle of at least 36 inches (preferably 42 inches) on at least one side of the seating rows. This ensures everyone can access their seats safely, even in the dark, and keeps the room from feeling cramped.
Lighting and Custom Finishes
Lighting in a theater is all about control. Traditional overhead lighting is distracting and ruins screen contrast.
- Dimmable LED Sconces: Mount low-wattage, dimmable LED sconces on the side walls. These should point light up and down, rather than out into the room. This provides enough light to locate your seat without spilling directly onto the projection screen.
- The Classic Star Ceiling: For a touch of luxury, consider an acoustic star ceiling panel system. These utilization-built panels feature fiber-optic light engines that mimic a clear night sky. They look extraordinary and double as excellent ceiling acoustic absorption.
- Dark-Toned Painting: Paint your walls and ceiling dark. Avoid any sheen; use deep, flat paints in charcoal gray, dark navy, or forest green. A white ceiling in a home theater acts like a giant mirror, bouncing light from the screen back into the room and washing out your image.
Wiring and Infrastructure: Future-Proofing the Build
The magic of a home theater is hidden behind the walls. During the framing shift of a remodel, we focus on three major infrastructure points:
1. Hidden Conduit
Technology changes rapidly. An HDMI cable that is state-of-the-art today might be obsolete in five years. We install 2-inch flexible PVC conduit (often called "smurf tube") running from your equipment rack to the projector location. This allows you to easily pull new, updated cables through the walls in the future without cutting open drywall.
2. In-Wall Rated Cables
All speaker wiring and HDMI cables run inside the walls must be rated for in-wall use (look for CL2 or CL3 ratings). For speaker runs under 50 feet, 14-gauge oxygen-free copper wire is the standard; for runs over 50 feet, upgrade to 12-gauge.
3. Dedicated Power
High-end amplifiers, subwoofers, and gaming consoles draw substantial power. To prevent your lights from flickering when the action on screen heats up, run at least one dedicated 20-amp circuit solely for your theater's AV equipment rack.
Building a dedicated home theater is an incredibly rewarding puzzle. When the acoustics, comfortable seating, crisp visual projection, and clean wiring converge, you get a custom space that will host countless movie nights and gaming sessions for decades to come.
If you are ready to transform an unused basement, spare bedroom, or bonus space into the ultimate dedicated home theater, we can help bring your vision to life. Reach out to the design and remodeling experts at Modern Builders of America today to schedule your free in-home estimate.